
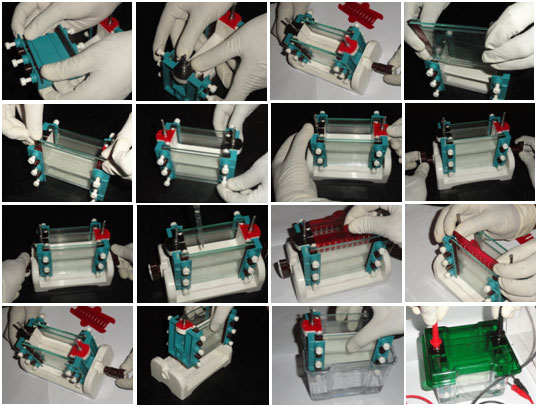
Instruction for Use
1. Place ‘supporting frames’ on both sides of ‘Casting side Supports’ which are engaged with ‘Supporting screws’.
2. Keep ‘Casting side supports’ vertically on a plain surface and insert ‘Dual Vertical assembly’ into the side supports as shown in the picture. Ensure that the ‘Casting side Supports’ fit tightly into the slot provided at the base of Dual vertical assembly.
3. Arrange the glass plates by properly inserting the spacers in between.
4. Place the Glass Plates with Spacers as shown in the picture.
5. Insert ‘sets of Glass plates till it reaches the bottom and get locked with the side supports
6. Fix the glass plates firmly with the vertical assembly by tightening the supporting screws.
7. Place this whole assembly on top of the Gel Casting Stand as shown.
8. Insert casting assembly screws on both ends of the Gel Casting Stand.
9. Then gently turn the casting assembly screws on both sides to 90 degrees. This would allow the entire casting assembly to get lowered and as a result both sets of glass plates would firmly sit on the silicone sheets placed on the casting stand which temporarily seal the bottom of glass plates.
10.&11. In this position the molten gel is added in between the glass plates and combs are placed firmly in place.
12. After solidification, remove the combs. Hold the comb at both ends and carefully remove as shown in the picture.
13, 14 &15.Remove the casting assembly screws from the casting stand. Gently lift and place the entire gel casting assembly into the Multi dual tank for running the gel. There is no hassle of removing the glass plates after casting the gel and transfer it to another assembly for running the gel.
16.Place the safety lid after pouring the required quantity of buffer into the tank and connect the power cord as shown in the picture.